Bot Builder Community – Alexa Adapter Update Preview

Since its launch, the Alexa Adapter for the Bot Framework, part of the Bot Builder Community Project on GitHub, which allows you to surface a Microsoft Bot Framework bot via an Amazon Alexa skill, has received great feedback. Today, I am excited to announce a preview of the next major iteration of the Alexa adapter, one which I hope provides additional benefits for developers, ensures full comparability with the latest developments in the Bot Framework and also ensures we are in the best position we can be to support the Alexa platform moving forward. This post is intended to provide an insights into what is happening and why, along with details of how you can try the preview update yourself and provide feedback.

So, here are the key details this post will cover.

  1. Obtaining / installing the preview and providing feedback
  2. Key Changes
    Adoption of Alexa.NET
    Adding support for Bot Builder Skills and the Virtual Assistant
    New Activity Mapping Middleware
    Integration Changes
  3. Updated Sample
Read More

Generating realistic speech on-the-fly with Azure Functions and Cognitive Service’s Speech APIs

Last week Chloe Condon, a Cloud Developer Advocate for Microsoft, posted a great article and accompanying open source project for helping people handle awkward social situations. The project – combining Azure Functions, Twilio and a Flic button (available from Shortcut Labs), allows a user to trigger a fake call using a discrete Bluetooth button, which triggers an Azure function, which in turn uses the Twilio API to make a call to a specified number and play a pre-recorded MP3. You can read much more detail about the project in the great article Chloe wrote about it over on Medium.

As a side note, Chloe describes herself as an ambivert, a term which I will admit I had never come across, but after reading the description fits me to a tee. As with Chloe, people assume I am an extrovert, but whilst I am totally comfortable presenting to a room of conference goers and interacting with folks before and after, I soon find myself needing to recharge my batteries and thinking of any excuse to extricate myself from the situation – even just for a short time. Hence, this project resonated with me (as well half of Twitter it seems!).

One of the things that struck me when first looking at the app was the fact that a pre-recorded MP3 was needed. Now, this obviously means that you can have some great fun with this, potentially playing your favorite artist down the phone, but wouldn’t it be good if you could generate natural sounding speech dynamically at the point at which you made the call? Step in the Speech service from the Microsoft Cognitive Services suite – this is what I am going to show you how to do as part of this post.

The Speech service has, over the last year or so, gone through some dramatic improvements, with one of the most incredible, from my perspective, being neural voices. This is ability to have speech generated that is almost indistinguishable from a real human voice. You can read the blog post where neural voices were announced here.

So, based on all of this, what I wanted to achieve was the ability to trigger an Azure function – passing the text to be turned into speech – and have that generate an MP3 file for me and have that available to use immediately.

This is what I am going to show you how to do in this article and below you can hear an example of speech generated using the new neural capabilities of the service.

Let’s get started….

Read More

Announcing the new Bot Builder Community Project

Update: This post has now been updated to reflect the new, expanded, structure of the Project, which now has repos for .NET, JavaScript and Python extensions, as well as bot development related tooling too.

Today, I am excited to announce a new community project, which I am leading with some good community friends of mine – the Microsoft Bot Builder Community Project.

First, a little background / history…

I, along with fellow community colleagues, have been creating open source extensions for the Microsoft Bot Builder SDK since it was in its initial early preview a couple of years ago.  Since then, I created some pretty well used extensions, such as the Best Match Dialog and the QnA Maker Dialog. Then, more recently with the advent of the v4 Bot Builder SDK preview, I started creating more extensions in the form of various bits of open source middleware and recognizers.

Last week I got talking with fellow MVP James Mann, who produces some fantastic videos about Bot development, Arafat Tehsin and another MVP, Michael Szul, who have both been producing some similarly awesome material on the subject.  We have all been building open source projects for the Microsoft Bot Builder SDK and it occurred to me that we should join forces and start some sort of community project for this stuff.

So, this brings us to now….

Today, we are delighted to announce the opening of the Bot Builder Community Project, an open source repo containing extensions in the form of things like middleware, recognizers and dialogs to make building bots easier.  The idea here is that this can be a central place where the community can contribute and we can build a broad collection of extensions for the SDK.

Right now the project has repos for .NET, JavaScript and Python extensions, as well as a tools repo for assisting with bot development.

We really hope this is the start of something great and that the project helps those developers who are building bots to build even better solutions.

Check out the project now on GitHub and find links to the NuGet / NPM packages there too.

Right now the project contains the following extensions for the Bot Builder .NET SDK, which I am focused on, and all of them are available via NuGet right now.

Dialogs

  • Bot Builder v4 Location Dialog – An implemention for v4 of the Bot Build .NET SDK of the Microsoft.Bot.Builder.Location dialog project built for Bot Builder v3. An open-source location picker control for Microsoft Bot Framework powered by Azure or Bing Maps REST services. This control will allow a user to search for a location, with the ability to specify required fields and also store locations as favorites for the user.

Middleware

  • Handle Activity Type Middleware – Middleware component which allows you to respond to different types of incoming activities, e.g. send a greeting, or even filter out activities you do not care about altogether.
  • Best Match Middleware – A middleware implementation of the popular open source BestMatchDialog for v3 of the SDK. This piece of middleware will allow you to match a message receieved from a bot user against a list of strings and then carry out an appropriate action. Matching does not have to be exact and you can set the threshold as to how closely the message should match with an item in the list.
  • Azure Active Directory Authentication Middleware – This middleware will allow your bot to authenticate with Azure AD. It was created to support integration with Microsoft Graph but it will work with any application that uses the OAuth 2.0 authorization code flow.
  • Sentiment Analysis Middleware –  This middleware uses Cognitive Services Sentiment Analysis to identify the sentiment of each inbound message and make it available for your bot or other middleware component.
  • Spell Check Middleware – This middleware uses Cognitive Services Check to automatically correct inbound message text.
  • Typing Middleware – This middleware will show a ‘typing’ event whenever a long running operation is occurring in your bot or other middeware components in the pipeline, providing a visual cue to the user that your bot is doing something.

Recognizers

  • Fuzzy Match Recognizer – A recognizer that allows you to use fuzzy matching to compare strings. Useful in situations such as when a user make a spelling mistake etc. When the recognizer is used a list of matches, along with confidence scores, are returned.

What’s next for the Microsoft Bot Framework?

In the last couple of months the Microsoft Azure Bot Service went GA (Generally Available), which was great news for all of the developers out there who have been using the platform and the associated Bot Builder SDK to build bots that can be surfaced across multiple channels, like Facebook, web chat, Skype, Slack and many more.  Production bots right now, hosted on the Azure Bot Service, use v3 of the SDK and it provides a solid platform for developing all sorts of types of chat bot scenarios.

Looking ahead, in the last couple of weeks, Microsoft has open sourced the next version, v4, of the SDK which is now under active development on GitHub.  I applaud the Bot Framework team at Microsoft for taking this approach (now becoming more and more common at Microsoft) of developing the SDK in the open and accepting contributions and feedback from the community, helping to ensure the next version builds on the awesomeness of the last.

I should say at this point, the team are very clear that v4 of the SDK is under active development and is therefore in a heavy state of flux and as such should only be used for experimentation purposes right now.  However, this gives us a great opportunity to see the direction of travel for the platform and Microsoft have even shared some of the high level roadmap for what we should expect looking forward over the next few months (again though, this is all subject to change).

Highlights

Here are couple of highlights (keep reading for some roadmap details further on :))

  • Much closer parity between the available flavors of the SDK – The v3 SDK is available for both C# and Node.js, but there are some key differences right now between the development approaches and some of the features available within each. e.g. FormFlow within the C# SDK, but not within Node.js.  Moving forward it looks like the team are aiming for a close to parity as possible between the SDKs, which will be hugely beneficial for developers, especially those who may end up using both of them.
  • Python and Java are joining the party – To accompany the .NET and JavaScript SDKs, the team are actively working on Python and Java options as well, which is great news and will allow an even broader set of developers to explore the benefits of the platform.  Right now the GitHub pages for Python and Java are not live yet, but keep an eye out for those soon (see the roadmap details below).
  • New middleware capabilities – The current version of the v4 SDK contains a new middleware system, which allows you to create rich plugins for your bot, or more generic middleware that can be used in multiple bots.  Every activity that flows in or out of your bot flows through the middleware components and therefore this allows you to build pretty much anything that you need.  A couple of example of middleware that exist right now are implementations for the LUIS and QnAMaker Cognitive Services.

The current roadmap

Obviously, in such an early stage the roadmap is likely to change, but in the spirit of transparency the team have shared some of the milestones that they envisage over the coming weeks and months.  The below is based on the public information the team have shared on the v4 wiki.

  • M1 – February 2018 – Public GitHub repos for C# and JavaScript SDKs.
  • M2 – March 2018 – Further ground work and consolidation of the SDKs, plus the introduction of the Python and Java SDKs.
  • M3 – April 2018 – Potentially this is when the initial API freeze will happen plus work on the migration story from v3 to v4 and helpers for developers relating to this.
  • M4 – May 2018 – Refinements and stabilisation work and this is also when the team are aiming for a broad public preview for the v4 SDK.

Where can I find this stuff?

Right now the .NET and JavaScript v4 SDKs are available on GitHub over at the links below and each has a really helpful wiki showing how the SDKs work right now and these will be kept up to date over time.  So if you are interested, head on over and check out the progress so far.  I for one am really excited to see more of the great work from the team over the next few months!

.NET v4 SDK on GitHub

JavaScript SDK on GitHub

QnAMaker Sync Library v1 and QnAMaker Dialog v3

I am pleased to announce the release of an updated version of the QnAMaker Dialog, allowing you to hook up a Bot Framework Bot and QnAMaker easily, and a brand new open source project, QnAMaker Sync Library, allowing you to sync an external data source to QnAMaker in a snap!

So, let’s look at the two new releases in a little more detail;

QnAMaker Dialog v3

GitHub -> https://github.com/garypretty/botframework/tree/master/QnAMakerDialog
NuGet -> https://www.nuget.org/packages/QnAMakerDialog/

If you haven’t seen the QnAMaker Dialog before, it allows you to take the incoming message text from the bot, send it to your published QnA Maker service, get an answer and send it to the bot user as a reply automatically.  The default implementation is just a few lines of code, but you can also have a little more granular control over the responses from the dialog, such as providing different responses depending on the confidence score returned with the answer from the service.

In the new v3 release, a couple of really significant improvements have been made.

The dialog is now based on v3 of the QnAMaker API (previously it was v1), meaning that when you query your QnAMaker service with the dialog you can now get more than one answer back if multiple answers are found.  This means that for queries which return multiple answers with similar confidence scores, you can potentially offer your user’s a choice of which answer is the best fit for them.

Secondly, v3 of the QnAMaker Service supports the addition of metadata to the items in your knowledgebase and the ability to use this metadata to either filter or boost certain answers.  The metadata is just one or more key/value string pairs, so you can add whatever information you like. e.g. you might add a metadata item called ‘Category’ and set an appropriate value for each answer, which you can then filter on when querying the service to provide a more targeted experience for your users.  The new QnAMaker Dialog release now uses this metadata and allows you to specify metadata items for both filtering and boosting.

More details about the QnAMaker dialog, including code samples for the new features are available over on GitHub.

QnAMaker Sync Library

GitHub -> https://github.com/garypretty/qnamaker-sync
NuGet -> https://www.nuget.org/packages/QnAMakerSync/

When you create a QnAMaker service, you can populate your knowledgebase in a few different ways – manually, automatically extract FAQs from a web page, or upload a tab separated file. However, many of you will already have your FAQ data held somewhere else, such as on your web site in your CMS or maybe within a CRM system.  What happens when you update the information in your other system? You probably need to go and manually update the knowledgebase in your QnAMaker service too, which isn’t great.  Added to this is the fact that behind the scenes (as mentioned above in the QnAMaker Dialog section), the QnAMaker service supports adding metadata to your QnA data to help you filter or boost certain answers when querying the service. The big problem right now though is that the QnAMaker portal doesn’t yet support the latest APIs and therefore you can’t add metadata through the UI.

So, what do you do?  Well, there are a set of APIs available for you to manage your knowledgebase, which includes metadata support, so you could go and write some code to integrate QnAMaker with your web site or repository – but there is no need now, because the QnAMaker Sync Library should hopefully have you covered!

The C# library allows you to simply write just the code needed to get your QnA items from wherever they are (e.g. FAQ pages on your site) and use them to build a list of QnAItems (a class included in the library).  Once you have this list, you then simply pass it to the QnAMaker Sync library (along with your knowledgebase and subscription ID) and voila, your data will be pushed into the QnAMaker service.  What’s more, when you build the list of QnAItems, you pass a unique reference for each item so that it can be identified in your original repository (e.g. a page ID from your web site) and these references are used the next time we sync so that we know which items to update and which to delete.

Full details as well as code samples are available over on GitHub and the library is now available via NuGet as well.


Microsoft Bot Framework – Store LUIS credentials in web.config instead of hardcoding in LuisDialog

Recently, I have been working on a release management strategy for bots built with the Bot Framework, using the tools we have in house at Mando where I work as a Technical Strategist.  As part of this work I have setup various environments as part of the development lifecycle for our solutions. i.e. local development, CI, QA, UAT, Production etc.  One of the issues I hit pretty quickly was the need to point the bot within each environment to it’s own LUIS model (if yo are not familiar with LUIS then check out my intro post here), as by default you decorate your LuisDialog with a LuisModel attribute as shown below, which means you need to hardcode your subscription key and model ID.

Obviously this need to hardcode isn’t ideal and I really needed to be able to store my Luis key and ID in my web.config so I could then transform the config file for each environment.

Thankfully this is pretty easy to achieve in Bot Framework using the in built dependency injection.  Below are the steps I took to do this and at the end I will summarise what is happening.

  1. Add keys to your web.config for your Luis subscription key and model Id.
  2. Amend your dialog that inherits from LuisDialog to accept a parameter of type ILuisService.  This can then be passed into the base LuisDialog class. ILuisService itself uses a class, LuisModelAttribute which will contain our key and Id, more on that in a minute.
  3. Next we create an AutoFac module, within which we register 3 types. Our Luis dialog, the ILuisService and the LuisModelAttribute.  When we register the LuisModelAttribute we retrieve our key and Id from our web.config.
  4. Then, in Global.asax.cs we register our new module.
  5. Finally, in MessagesController, this is how you can create your Luis Dialog.

That’s it.  After those few steps you are good to go.

So, let’s summarise what is happening here.  When you application loads the ILuisService and your Luis dialog are registered with AutoFac.  Also registered is a LuisModelAttribute, into which we have passed our key and id from our web.config.  Once that module has been registered, we can then get the instance of our dialog using scope.Resolve<IDialog<IMessageActivity>>().  This dialog takes an ILuisService as a parameter, but because we have registered that with AutoFac as well this passed in for us automatically. Finally the ILuisService needs a LuisModelAttribute, which, again, because we have registered this in our module is handled for us.

Once you have completed the above you can alter your Luis subscription key and model id by simply amending your web.config.

Optimising your Bot Framework bot for Facebook Part 1 – The Get Started button

When building chat bots with the Bot Framework, we are in a great position of being able to target many channels with a single bot.  However, that doesn’t mean you should simply enable your bot on multiple channels without considering how you can optimise the experience for users of individual channels.

In this and the next couple of posts I am going to be looking at a few ways you can optimise your bot for use with the Facebook channel.

In this post I am going to start off with looking at enabling a better on-boarding experience for your users using the ‘Get Started’ button.

Why?

Before we talk about the how, lets quickly touch on the why. On-boarding is a super important thing to consider when building a bot. The worst possible experience in most cases is a bot that doesn’t set any expectations for the user and simply starts with a blank message window.  This can lead to confusion and even the user thinking that they are going to be messaging a human, which is usually not what you want.  Think about it, if your users are talking to a bot (and they know it) and it gets things right 9 times out of 10, they are going to be pretty impressed because they are getting serviced instantly and in return are likely to be more forgiving of a few mistakes. However, if they think they are talking to a human and the ‘human’ gets simple things wrong 1 times out of 10, they are likely to get frustrated.

On-boarding is also a great way to set users expectations about what a bot can actually do. By providing a welcome message to your users, greeting them and listing a few features and maybe some examples of how they can get started with your bot, you are reducing the chance of the user asking the bot to do something it cannot do and therefore reducing the chance of errors and poor experience.

Can I not use conversation updates and the Facebook greeting message?

Under normal circumstances, on most channels, we can use the Conversation Update activity, special types of activities sent to your bot when events like a user starting the conversation occur. Unfortunately these do not work consistently across all channels and whereas you can use something like this to send a welcome message in web chat, the same doesn’t work for Facebook – so we need to find another way of getting our welcome message to the user.

You also have the option of using the Facebook greeting message, which is shown to users before they send their first message to your bot.  As you can see in the image below on the Walt Disney World bot I released recently (more on that in another post), I have started to set the user’s expectations of what my bot can do using this message.  This is absolutely something you should use and is a useful tool in and of itself, but it has it’s limitations. Namely you don’t get a lot of characters to work with and sometimes users may just ignore it and simply start talking to your bot, at which point it’s gone.

2017-08-02_8-47-20


Enter the Facebook Get Started button

Thankfully, Facebook have thought about this and have given us a way of knowing when a user is starting a conversation with our bot. The Get Started button can be enabled on your Facebook Messenger bot so that a user must click it before they are able to send a message to your bot.  When they do click it, we receive specific Facebook channel data on the Activity that is sent to our bot, meaning we can look out for it and respond appropriately.

Before you can handle the Get Started button in your bot, you need to enable it. To do this you need to send a Curl request like the one below, replacing the page access token with your own (you will have generated this when you registered your bot with the Facebook channel).

Once enabled, when a user first chooses to message your bot, they will see the Get Started button. Here it is in action on my bot. Hint: If you have already started a conversation with your bot through Facebook, you can click the settings icon in Messenger and delete the conversation. Next time you start a conversation, you will get the Get Started button as if it was the first time.

2017-08-02_8-40-56


Handling the Get Started button in your Bot Framework code

When a user clicks the Get Started button and the resulting Activity reaches your bot, you need to do two things;

  • Check if the incoming message is from the Facebook channel
  • If it is, check for the Get Started button postback payload (you can read more about channel specific data over at the excellent Bot Framework docs site

Below is an example of how you can achieve this by altering your Post method on your bots MessagesController.

If the Get Started payload is found, you can then call another method to send a welcome message to the user, which could look something like this.

You could even send the user a choice prompt so that they can simply choose an option to get started with your bot!

Summary and what’s next for Facebook optimisation for your bot?

Hopefully this post has given you a good tool  to add to your armory when building bots with great user experience in mind. I encourage you to always consider what channel specific capabilities you can take advantage of.  Don’t forget, in many cases users will already be used to such channel capabilities, like the Get Started button, from their interactions with other people and bots on the platform.

In the next post I will be discussing the Persistent Menu and how you can use it to give your users access to quick actions anytime during their conversation.  Here’s a peek of what it looks like.

2017-08-02_9-13-57

Creating and testing a Cortana Skill with Microsoft Bot Framework

With the release of the new Cortana Skills Kit, with Bot Framework integration, we are now able to create skills which are backed by bots! This is a really exciting prospect as now we can potentially have a bot that can serve both text based channels, as well as other speech enabled channels like Cortana.

Even if you are familiar with the Bot Framework, there is quite a lot of new pieces to consider when creating a bot on the Cortana channel. However, in this post I am going to go through how you can create a basic Cortana Skill using a Bot Framework bot and test it, by talking with your skill, in Cortana.

Setup your developer environment

First things first.  Right now the Cortana Skills Kit is only available to use for the US (United States) language and region and so before you do anything you will need to set your environment’s language and region settings to US English.  You will also need to alter the region on your Android / iOS device if you plan to use the Cortana app to test your skill, which is what I will be doing as part of this post.

Register your bot and create your skill in the Cortana Developer Dashboard

Now, before we start building out Cortana enabled bot, we need to create our Cortana Skill from the developer dashboard.  You can do this by either creating your skill in the Cortana Developer Dashboard at https://developer.microsoft.com/en-us/cortana/dashboard where you can then be redirected to the Bot Framework dashboard to register a bot. Or, alternatively, you can register your bot in the Bot Framework dashboard first and then enable the Cortana channel – which incidentally is what you will want to do if you want to enable Cortana for an existing bot.

For this example, I have registered a bot in the Bot Framework portal first. My demo bot is called ‘HR bot’ and can help the user book meetings and let their employer know if they won’t make it into work.  I won’t go over how to register a bot in this post, but if you need a refresher or this whole Bot Framework game is new to you then head over to some of my earlier posts where you can find out about getting started and some of the basics.

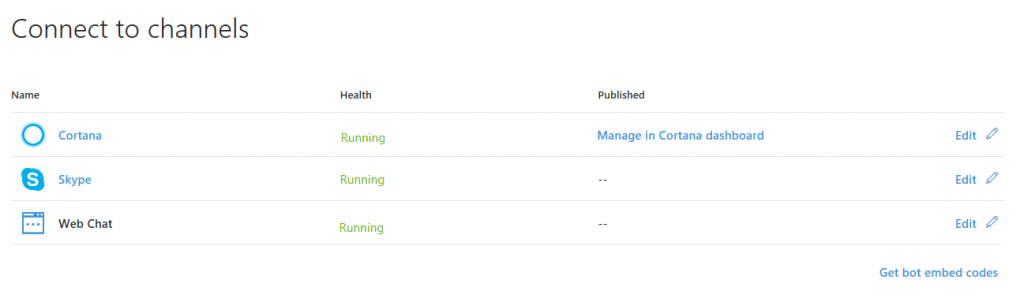
Once you have registered your bot in the Bot Framework portal, you should notice that Cortana is now an available channel (along with the new Skype 4 Business and Bing channels – but that’s for another post!).

Selecting the new channel will open a new window and take you to the Cortana Skills Dashboard in order for you to setup your new skill that will be connected to your bot.  Here we need to provide a few pieces of information, with the most important two being;

  • Display name – the name shown in the Cortana canvas when a user users your skill
  • Invocation name – This is really important because this is the name used for a user to talk to your skill. e.g. “Hey Cortana, ask HR Bot to book a meeting for me”.  It is really important to pick an invocation name that is easy for a user to say and equally easy for Cortana to understand. I will be posting another blog at some point soon with some best practice information.

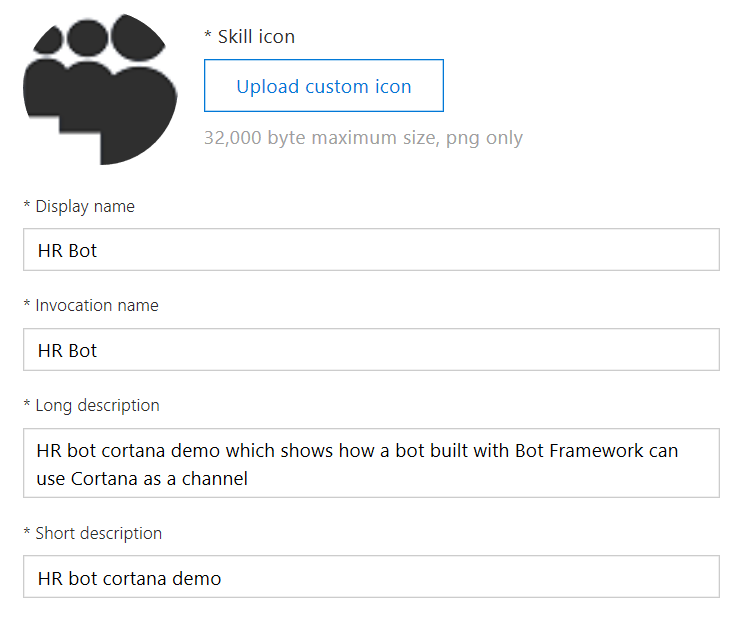
There are additional options available to you on this page, such as the ability to surface user profile information through your skill to your bot and I will explore these in future posts, but for now just enter the basic information and save your changes.  Once you have done this, you should now see Cortana is registered as a channel for your bot!

Teach your bot to speak!

Now that we have registered our bot and enabled the Cortana channel, its time to build the bot itself with the Cortana channel in mind.

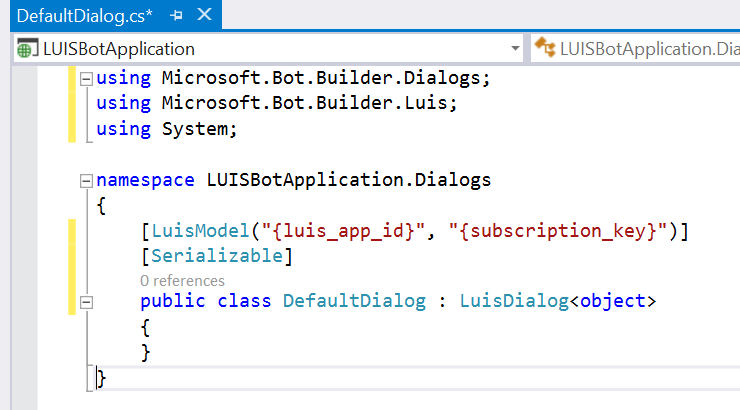
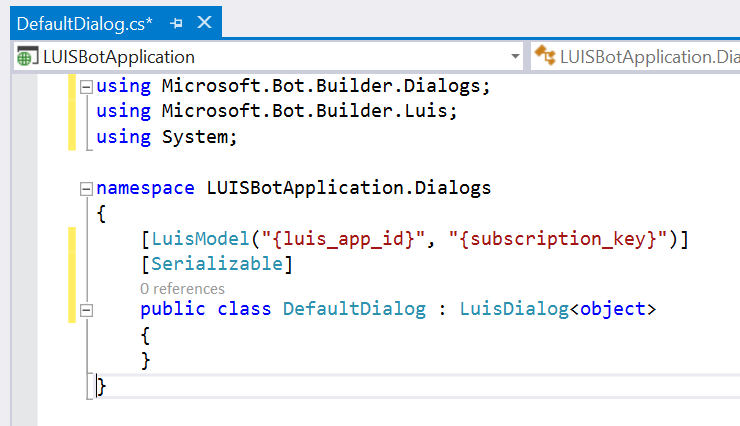
For my example, I have something that will be very familiar to anyone who has been developing with the Bot Framework to date, a bot that is integrated with the LUIS Cognitive Service. One of the intents I have wired up is ReportAbsense, where a text based conversation in a channel like web chat might look similar to the one shown below.

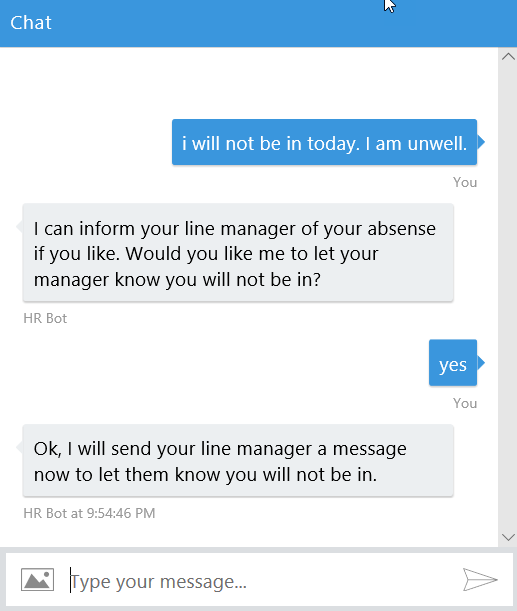
Up until now, to achieve the above conversation we would use the PostAsync method on our conversation context object to send messages to the user, supplying the text that we want to post into the channel. The code for the conversation above would look something like the below.

With the latest release of the Bot Framework SDK, a new method is now available to us which we can use when we are dealing with speech enabled channels – context.SayAsync.

Using the SayAsync extension method, we can specify both the text that we would like to display in text based channels, but also the speech that should be output in speech enabled channels like Cortana. In fact, Cortana will show both the text on the screen (providing the Cortana device has a screen – like a PC / phone) and also say the speech you define. The built in prompt dialogs now also support speech enabled channels, with additional properties speak and retrySpeak.  This means we can tailor our messages depending on the method of communication and also ensure our bot can support both speech and non-speech enabled channels.

After updating the above code to use the new SayAsync method and updating our prompt to include the options for speak / retrySpeak, it now looks like the below.

You can now use these methods to build a bot, or update an existing bot.  Then you can deploy it and ensure that the bot’s endpoint is updated in the Bot Framework dashboard as you would with any other bot.  Once you have done this you are almost ready to test your bot on Cortana.

Before moving on to testing our bot though, there are a few things worth pointing out;

  • The SayAsync method also allow you to set options including an InputHint (ExpectingInput / AcceptingInput / IgnoringInput) which tells the Cortana channel if you are expecting input and if the microphone should be activated following your message being posted or not. e.g. you might send multiple separate messages all at once, with each setting their InputHint to IgnoringInput, apart from the last.  This helps ensure that no input is accepted until all messages have been sent.
  • You can specify the message to be spoken directly on an activity object as well as using the SayAsync extension method.

I plan to go into more detail about all of the various aspects of building bots for Cortana in future posts, with this post simply designed to be an introduction.

Enable debugging and testing our new skill

Now for the really exciting bit, testing our new Cortana enabled bot!

First we first need to enable debugging within the Cortana dashboard.  This will make your skills available on Cortana devices where you are signed in with the same Microsoft Account under which you have registered the skills.  It will also enable additional debug experiences, such as the ability to see additional information sent between your bot and the device.

Now that we have enabled debugging, we can use a Cortana enabled device, such as a Windows 10 PC or an Android / iOS device.

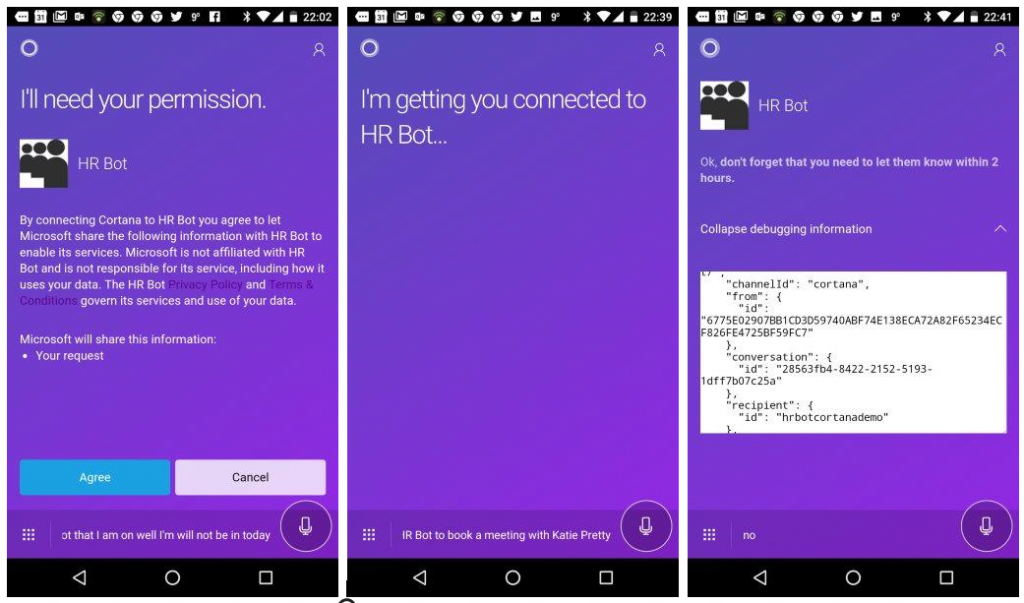
For my example, I launched the Cortana app on my Android phone and said “Hey Cortana, tell HR Bot that I am not well and will not be in the office today“.  At this point Cortana correctly identified my skill, connected with my bot and, because it was the first time I had used the skill, presented me with a permission dialog where I can agree to continue using the skill.

Once I have accepted I can continue to converse with my skill with my voice, just as I would with my keyboard in another channel.

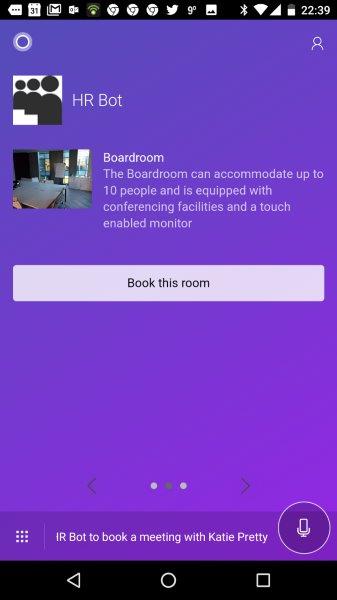
As mentioned earlier, you can see that Cortana is displaying accompanying text messages on the canvas as well as outputting speech and we can also continue to use other elements that we already utilise on other channels today, such as cards, to display other appropriate information.

Hopefully this post has helped you get up and running with a Cortana Skill backed by the Bot Framework. Watch out for future posts soon about other Cortana Skill features!

Using Scorables for global message handling and interrupting dialogs in Bot Framework

If you have been using Bot Framework for any length of time, you will likely be familiar with dialogs and the dialog stack – the idea that you have a root dialog and you can pass control to child dialogs which, when finished, will pass control back up to their parent dialog.  This method of dialog management gives us a lot of flexibility when designing our conversational flow.  For example, using the LUIS service to determine a user’s intent, but then falling back to a QnA Maker dialog if no intent can be recognised.

However, there are times when we might want to be able to interrupt our current dialog stack to handle an incoming request, for example, responding to common messages, such as “hi”, “thanks”, “how are you” etc.  Scorables are a special type of dialog that we can use within Bot Framework to do just this – global message handlers if you will!

Scorable dialogs monitor all incoming messages to a bot and decide if they should try to handle a message.  If they should then they set a score, between 0 and 1 as to what priority they should be given – this allows you to have multiple scorable dialogs and whichever one has the highest score will be the one that handles the message.  If a scorable matches against an incoming message (and has the highest score if there are multiple matches) then it can then handle the response to the user rather than it being picked up by the current dialog in the stack.

Simple example

Below is an example simple scorable dialog that is designed to respond to some common requests as described above.

Let’s discuss what’s happening in the code above.

I the PrepareAsync method, our scorable dialog accepts the incoming message activity and checks the incoming message text to see if it matches one of the phrases that we want to respond to.  If the incoming message is found to be a match then we return that message, otherwise we return null.  This sets the state of our dialog which is then passed to some of the other methods within the dialog to decide what to do next.

Next, the HasScore method checks the state property in order to determine if the dialog should provide a score and flag that it wants to handle the incoming message.  In this instance the dialog is simple checking to see if the PrepareAsync method set our state to a string.  If it did then HasScore returns true, but if not (in which case state would be null) it returns false.  If the dialog returns false at this point then the message will not be responded to by this dialog.

If the HasScore returns true then the GetScore method kicks in to determine the score that the dialog should post so that it can be prioritised against other scorables that have also returned a score.  In this case, to keep things simple, we are returning a value of 1.0 (the highest possible score) to ensure that the dialog handles the response to the message.  There are other scenarios where we might wish to return an actual score, for example you might have several scorables, each sending the incoming message to a different QnA Maker service and if an answer is found the score could be determined based on the response from the QnA Maker service.  In this scenario the dialog that receives the highest confidence answer from it’s service would win and respond to the message.

At this point, if the dialog has returned a score and it has the highest score amongst any other competing scorables, the PostAsync method is called. Within the PostAsync method we can then hand off the task of responding to another dialog by adding it to the dialog stack, so that it becomes the active dialog.  In the example we are checking to see which phrase the incoming message matches and returning an appropriate response to the user by passing the response to a very basic dialog shown below (hint: it’s a very basic dialog to illustrate the point, but you could add any dialog here).

Once the dialog above is completed and calls context.Done, we are passed back to our scorable and the DoneAsync method is called and the process is complete.

The next message that gets received by the bot, providing it doesn’t match again with a scorable dialog, will pick up exactly where it left off in the conversation.

Registering a scorable

In order for scorables to respond to incoming messages, we need to register them.  To register the scorable in the example above we first create a module that registers the scorable.

Then register the new module with the conversation container in Global.asax.cs.

Summary

In this post we have seen how you can use scorable dialogs to perform global message handling.  There are many potential use cases for using scorables, including implementing things like settings dialogs or having some form of global cancel operation for a user to call, bot of which can be seen in one of the samples over at the Bot Builder Samples GitHub Repo.

Personally, I love scorables and I think you will too.

Forwarding activities / messages to other dialogs in Microsoft Bot Framework

I have been asked a question a lot recently – is it possible to pass messages / activities between dialogs in Microsoft Bot Framework?  By doing this you could have a root dialog handling your conversation, but then hand off the message activity to another dialog.  One common example of this is using the LUIS service to recognise a user’s intent, but handing off to a dialog powered by the QnA Maker service if no intent is triggered.

Thankfully this is very simple to do.

Normally to add a new dialog to the stack we would use context.call which adds a dialog to the top of the stack. However, there is another method which was added some time ago but is not as widely known, context.forward, allowing us to not only call a child dialog and add it to the stack, but also let us pass an item to the dialog as well, just as if it was the root dialog receiving a message activity.

The example code below shows you how to forward to fallback to a dialog that uses the QnA Maker if no intent is identified within a LUIS dialog.

In the example above, a new instance of the FaqDialog class is created and the forward method takes the incoming message (which you can get as a parameter from the LUIS intent handler), passes it to the new dialog and also specifies a callback for when the new child dialog has completed, in this case AfterFAQDialog.

Once it has finished, the AfterFAQDialog will call context.Done and in the example will pass a Boolean to indicate if an FAQ answer was found – if the dialog returns false then we can provide an appropriate message to the user.

That’s it, it is super simple and unlocks the much asked for scenario of using LUIS and QnAMaker together, falling back from one to the other.