In my previous posts I have shown how we can use the Microsoft Bot Framework to create smart, intelligent bots that users can interact with using natural language, which is interpreted using the LUIS service (part of Microsoft Cognitive Services). The bots that we can create using these tools are really powerful but, in most cases users are still typing text when communicating with the bot. This is perfectly ok in most situations, but it would certainly be fitting for some requirements to actually be able to allow he user to just talk to the bot using speech and have the bot respond in the same way. There are examples of where this can be done on the existing bot channels already, such as users using the Slack mobile app with a voice recognizer function so you don;t have to type your text, but what if we wanted to bake this into our own app? In this post I am going to provide some basic code that allows a user to converse with a bot using speech in a Windows 10 UWP app.
If you are not familiar with UWP apps and development, which for this post I am assuming you are, then there are a ton of resources available out there that can help you.
Key features of the sample app
The main objectives for the sample flow I will build in my app are;
- Start listening for a user’s voice input as soon as the app starts
- When speech is detected, get the text representation and send this to our bot
- Wait for a reply from out bot and use the speech synthesiser to read the reply to the user
- Start listening for user speech again and repeat the process
At this stage I am adding no UI to the app at all as the objective here is simple to demonstrate how to carry out the speech related tasks with our bot, but in a future post I will look at how we can add UI to the app, including how to render special types of messages such as Cards and Attachments.
Creating our app project
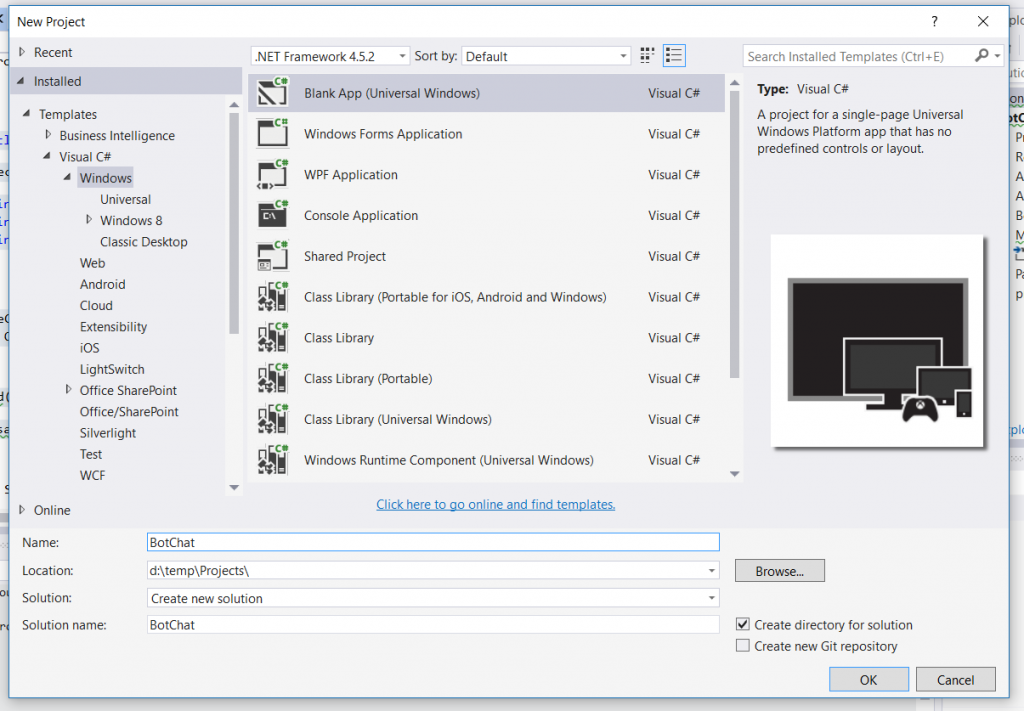
The first thing we need to do is open Visual Studio and create a blank Universal Windows app (you will need to make sure that you have the Windows development SDKs installed in order to see this project type in the list). This will then create us a blank project with a single page called MainPage.xaml, which is where we are going to place all of our code in this example.
Configuring your bot and adding the Bot Framework Direct Line NuGet package
As part of this app, as well as managing the speech side of things, we obviously need someway of communicating with our bot. The Bot Framework has a very capable Rest API which we can use to communicate with bots over the Direct Line channel, a channel that sits along others like Skype and Facebook that allows us to integrate bot functionality into our own apps, In order to allow us to communicate with our bot on the Direct Line channel we need to configure it in the Bot Framework dashboard over at http://dev.botframework.com – from your bot settings page you can select the Direct Line and complete the instructions to configure the channel. Once completed you will have generated a secret which we will need later on.

Now that your bot is configured correctly for the Direct Line channel we can get on with the business of adding code to our app to send / receive messages to / from our bot. Luckily for us the team behind the framework have released a client SDK which hides much of the complexity of dealing with this API. To take advantage of this API, we need to add a NuGet package called Microsoft.Bot.Connector.DirectLine to our project, so use the search facility and install this to your app project now.

Establishing a new conversation
Now that we have the Direct Line NuGet package installed we can start a conversation with our bot. The code below shows a method called StartBotConversation which uses the SDK to create a new conversation on the channel and return a Conversation object. We are calling the StartBotConversation method once our page has loaded using the OnLoaded event handler.There are also added 3 properties to the page;
- directLineSecret – This should be set to the value of the secret your generated earlier when configuring your bot
- botId – bot handle as shown in the dashboard
- fromUser – This will be used as the name of the user who is sending the messages from the app to the bot, so this can be anything you wish, but you probably want to make it obvious where the message is coming from. in my example I have called it BotSpeechChatApp
Right now all the StartBotConversation method is doing is to create a new DirectLineClient using our Direct Line secret and requesting that the bot starts a new conversation and creating a new Conversation object which we can use to post and get messages.
|
1 2 3 4 5 6 7 8 9 10 11 12 13 14 15 16 17 18 19 20 21 22 23 24 25 |
public sealed partial class MainPage : Page { SpeechRecognizer recognizer; private static string directLineSecret = "<DIRECT LINE SECRET>"; private static string botId = "<BOT HANDLE>"; private static string fromUser = "BotSpeechChatApp"; public MainPage() { this.InitializeComponent(); this.Loaded += OnLoaded; } async void OnLoaded(object sender, RoutedEventArgs args) { StartBotConversation(); } private async Task StartBotConversation() { var client = new DirectLineClient(directLineSecret); var conversation = await client.Conversations.NewConversationAsync(); } } |
Listening for user input using speech recognition
Now that we have our bot conversation started, we need to wait and listen for the user to say something in order for us to send the message over to our bot. To do this we need to expand on our StartBotConversation method.
We start by using the SpeechRecognizer class in the Windows.Media namespace, which can handle listening for speech input and, once input is detected, returns a SpeechRecgnitionResult containing the text that was recognised. The first thing we are doing below when creating the recognizer object is setting the language that we wish to use – this ensures that accents from that particular language (e.g. en-GB) are being used to match against, thus providing more accurate results. This class can also handle a number of recognition scenarios, including a continuous mode for tasks such as dictation, and has a number of timeouts that can be set depending on your requirements. You are also able to set constraints, such as grammar or command phrases, on the SpeechRecognizer in order to restrict the possible results and therefore provide a better chance of a right result.
For this example I have chosen to not constrain the input with any grammar (it is worth noting that you must always call CompileConstraintsAsync even if you do not specify any), which will allow users of the app to say anything to our bot. I have also set an InitialSilenceTimeout of 1 day, which means that the recognition session will not end because of a long period of silence. e.g. we could start the app and wait for up to 1 day to accept user input, which is ideal if we want our app just always be listening.
In the code below, once I have setup the recognizer, I call RecognizeAsync to start the recognition session. Then once a result has been returned I check to see if any text is contained within the results, which if there is we compose a Message object (part of the Models within the Direct Line SDK) specifying the sending user and the text, and then post our message to our bot using the PostMessageAsync method. At this point, we then need to wait for a reply from our bot and read the text in the reply back to the user, which is the responsibility of our ReadBotMessagesAsync method and we will take a look at that in just a second. Before we do though you can see that once the ReadBotMessagesAsync method has completed it returns a watermark object, which we then pass back into the same method next time we loop in order to ignore messages from our bot we have already handled. We are also awaiting the method in order to ensure we are not starting to listen for input again until the message has been read to the user, or you end up in an unfortunate situation where the bot is listening and then replying to itself!
|
1 2 3 4 5 6 7 8 9 10 11 12 13 14 15 16 17 18 19 20 21 22 23 24 25 26 27 28 29 30 31 32 |
private async Task StartBotConversation() { var client = new DirectLineClient(directLineSecret); var conversation = await client.Conversations.NewConversationAsync(); var topUserLanguage = GlobalizationPreferences.Languages[0]; var language = new Language(topUserLanguage); recognizer = new SpeechRecognizer(language); await recognizer.CompileConstraintsAsync(); string watermark = null; while (true) { recognizer.Timeouts.InitialSilenceTimeout = TimeSpan.FromDays(1); var result = await this.recognizer.RecognizeAsync(); if (result != null && !string.IsNullOrEmpty(result.Text)) { Message message = new Message { FromProperty = fromUser, Text = result.Text }; await client.Conversations.PostMessageAsync(conversation.ConversationId, message); watermark = await ReadBotMessagesAsync(client, conversation.ConversationId, watermark); } } } |
Waiting for a reply, synthesising the text and reading it to the user
As I mentioned earlier, once some speech from a user has been recognised and we have posted it to our bot, we then need to wait for a response and read it back to the user. In the ReadBotMessagesAsync method we begin by setting a Boolean flag so that we can track if we have received a message and then enter a loop where we call the client.Conversations.GetMessagesAsync SDK method which takes our conversation ID and the watermark that we receieved earlier from the post method so that we only get the messages we care about. Each time we receieve a response from the Direct Line channel we check to see if there are any messages that we need to read out – if not we loop again, if there are then we move on to read out the message.
Once we have a message I am calling a method I have added called SynthesiseTextAsync to read the text to the user. This method is relatively straight forward and uses a SpeechSynthesizer class to generate a stream which we then play using a MediaElement object. As part of this a SSML (Speech Synthesis Markup Language) string is created which is used to determine what form the generated stream would take, such as the language of the voice, in this case set to en-GB.
Finally, back in the ReadBotMessagesAsync method, in order to ensure that we wait for the message to be fully read out to the user before we continue, a task is created which is only completed when the MediaEnded event has fired.
|
1 2 3 4 5 6 7 8 9 10 11 12 13 14 15 16 17 18 19 20 21 22 23 24 25 26 27 28 29 30 31 32 33 34 35 36 37 38 39 40 41 42 43 44 45 46 47 |
private async Task<string> ReadBotMessagesAsync(DirectLineClient client, string conversationId, string watermark) { bool messageReceived = false; while (!messageReceived) { var messages = await client.Conversations.GetMessagesAsync(conversationId, watermark); watermark = messages?.Watermark; var messagesFromBotText = from x in messages.Messages where x.FromProperty == botId select x; await Windows.ApplicationModel.Core.CoreApplication.MainView.CoreWindow.Dispatcher.RunAsync(CoreDispatcherPriority.Normal, async () => { foreach (Message message in messagesFromBotText) { await SynthesiseTextAsync(message.Text); } messageReceived = true; }); var playMediaTask = new TaskCompletionSource<bool>(); mediaElement.MediaEnded += (o, e) => { playMediaTask.TrySetResult(true); }; await playMediaTask.Task; } return watermark; } async Task SynthesiseTextAsync(string text) { using (var speech = new SpeechSynthesizer()) { speech.Voice = SpeechSynthesizer.AllVoices.First(gender => gender.Gender == VoiceGender.Male); string ssml = @"<speak version='1.0' " + "xmlns='http://www.w3.org/2001/10/synthesis' xml:lang='en-GB'><prosody rate=\"medium\">" + text + "</prosody></speak>"; SpeechSynthesisStream stream = await speech.SynthesizeSsmlToStreamAsync(ssml); mediaElement.SetSource(stream, stream.ContentType); mediaElement.Play(); } } |
Summary, a few things to note and sample code
During this post you have seen how we can use the Bot Framework Direct Line API, and speech recognition and synthesis in a UWP app to allow a user to have a continuous conversation with a bot. It is worth pointing out a couple of things though;
- This is far from production ready code, but instead is designed to show that this could be done with a relatively small amount of code and effort and provide you with something to build on.
- As this example is using a loop to wait for a reply and then waiting for input from the user again, this means that we are assuming that the bot will always respond with a single message for a single message from the user. You would need to approach this differently if you wanted to send pro-active or multiple messages to / from your bot.
The sample app for this post is available to grab from my GitHub repository. As always I would love to hear your comments / feedback.